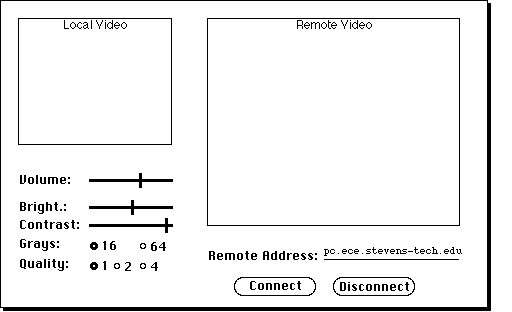
To begin, we designed our draft interface to give ourselves a basis point for the code which will follow. By doing this now, it gives our team a shell in which the pieces can plugged into ensuring interoperability and completeness. The Java code which controls and implements this interface will be the last component constructed as it depends heavily on the other parts which are much more independent in their organization.
Of the three main subprograms, we concentrated on the one most unknown to us: the video systems. This effort began with the goal of fully understanding the operation of the QuickCam and the coding needed to control it. To this end, the majority of the time spent has been to understand existing implementations of QuickCam-based video conferencing and QuickCam control via web browsers. This involved studying the hundreds of pages of code which compromise the existing implementations described above (A QuickCam Inside A Java Applet and Qcam Multimedia). Our design team also obtained, from QuickCam Developer Relations, the Connectix PC QuickCam Interface Specifications which detail the operations of the camera and accompanying microcontrol systems, as well as the commands needed to use them. (The details of this document are covered by a nondisclosure agreement, and hence cannot be specifically addressed in this report.)
The operations needed to interface with the QuickCam can be summarized by the following flowcharts:
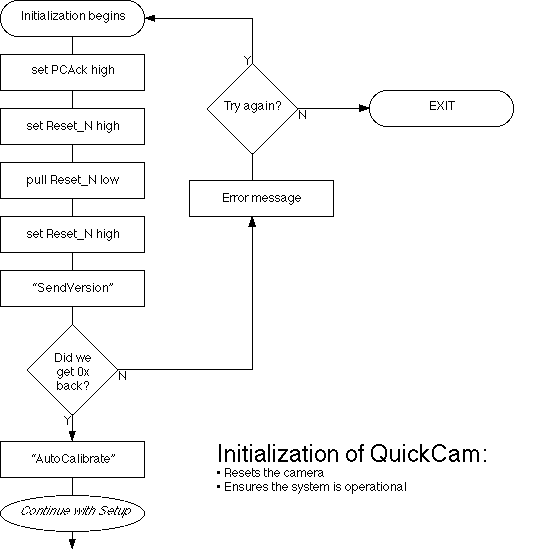

It is noted that commanding the camera is not as simple as just sending a command out. One must send the command, read the echo of that command and process it for any error, then send the parameters to the command issued and process that echo. Similarly, to read values (other than video frames) from the camera, requires both sending and receiving the appropriate command in addition to read the value itself.
Getting video from the camera depends on what mode the camera is operating in. This in turn is dependent on the capabilities of the host computer and the appropriate software flags being set. Nybble mode transfers each video frame in pieces, with each piece being four bits in length. This is due to the design of older parallel ports, where there are twelve output pins, five input pins and eight grounds. Newer hardware allows for bidirectional parallel ports where some of the output pins can be used for input as well. In this configuration, video is transferred twelve bits at a time. Because the Nybble mode is supported on all hardware, and is the only mode supported for the transmission and reception of non-video data (commands and parameters), it will the first mode to be implemented. Time permitting, support for byte mode will be added nearer to the end of the project. It is noted that this decision will reduce the maximum possible throughput of the system, but the advantages of full compatibility with existing hardware makes this the more important of the two modes.
The audio and network components were only roughed out, with the specifics to be determined later in the project. The audio subsystem requires initialization routines (opening the microphone for "reading" in the audio and the speaker for "writing" out audio) and the ability to control the subsystem (volume, etc.). The network subsystem requires setup in terms of opening TCP connections on both end of the conference and managing data flow, including the packetization of the audio, video and control streams. All three subsystems (audio, video and network) will naturally require routines to close and reset all resources after the conference ends.
Time was also spent getting acquainted with the relatively new Java language as this information will be needed when we get to the final system, the interface. The key piece of information this research revealed is that, while it is possible to use C++ code, this would require writing custom interfacing routines for it to be usable to the Java portions of the project. On the other hand, using the more basic C commands allows us to take advantage of the hooks already built into the Java command library. This trade-off will be made in the interests of a more easily ported solution, and a more standard solution which should be more reliable since it is based on the work (and debugging) of hundreds or thousands of programmers around the world.
The audio transducers, which both receive and emit at 40KHz were tested by applying 20-25 volt peak to peak sine waves across the terminals. Other, receiving transducers were placed at various distances away from the transmitter to get a sense of the effectiveness, range, and directionality of these components. Without any transmission the receivers would, on the average, produce about 5mv rms. With the transmitter pointing at the receiver, the receivers would produce 15mv rms at the minimum. This figure was obtained with the distance between the two transducers being approximately 12 feet. As the distance was shortened, the receiver output went up to about 40mv rms. As was expected, the sound is highly directional at 40KHz, thereby decreasing the off axis response. This shows the need for a "TV remote" type of system, where the user merely points the transmitter in the general direction of the camera and presses a button to cause the camera to track/move. Upon further experimenting and attempting to increase the receiver output, it was found that when a square wave at 40KHz was used to drive the transmitter the receiver would consistently give a somewhat higher output than the 40KHz sine wave. Thus, it seems that the transmitter pack will utilize a square wave generator (with appropriate current boosters) and a push-button switch for transmission.
The purpose of the interface circuit is to compare the output of the transducers (a 40KHz sinusoid) with a certain threshold value and produce TTL logic levels for the HC11 to use for its calculations. The first issue in this design is how to compare an AC voltage with a DC threshold. The requirement is that the output of the interface circuit go high, and remain high, upon reaching a threshold. Thus, to prevent oscillations, the output is passed through a series of gates with feedback (see schematic) to lock the high value even when the incoming signal falls below the threshold. The output is reset to zero only by an external control bit from the HC11.
The other issue involved in the design was that the input to the comparators must never fall below zero volts (a requirement of the LM339). Thus, the incoming sinusoid is placed on a DC level of about 2.5 volts by means of a summing amplifier (using the LM324). This output is then compared to a DC threshold set by a potentiometer and the output is fed to the previously discussed "locking" circuit.
Thus, as the sound first arrives at one of the transducers, it causes the output of the interface circuit (channel A) to go to a logic 1. This rising edge is detected by the HC11's input capture function which stores the value of a free running clock in a register. The sound then arrives at the other transducer, causing the HC11 to store the new value of the free running clock into another register. Thus by simply finding the difference between the two registers, the arrival time difference for the sound can be easily obtained. This data is then used by the HC11 to determine the angle between the transmitter and the camera.
The task of the HC11 is to take the difference of the input capture registers (which contain values of the clock based on the edge detected on the input capture pins), and perform what amounts to a simple arccosine calculation. The angle obtained by this calculation is the angle between the receivers and the transmitter. This information can then be used to move the camera to the desired location.
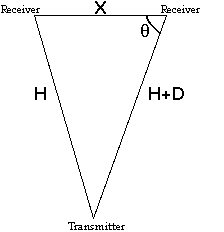
The derivation of the angle calculation can be best explained by the
diagram
shown below. The top two vertices of the triangle represent the two receivers
and the bottom vertex represents the transmitter:
From the law of cosines we get the following:
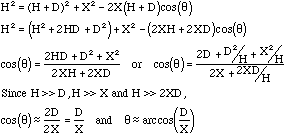
To calculate the arccosine, two options are available. The first is to calculate the first few terms of the Taylor Series of the arccosine. The second option is to merely create a look up table for the cosine function. This seems to be the option which has ease of implementation and less processing power required. Thus the look up table option was the one chosen for the design. For all of these calculations, a floating point package was obtained for the HC11, which allows for all the conventional floating point calculations (with the use of pseudo-floating point accumulators) in addition to useful trigonometric functions. The arccosine HC11 code is included in the appendix.
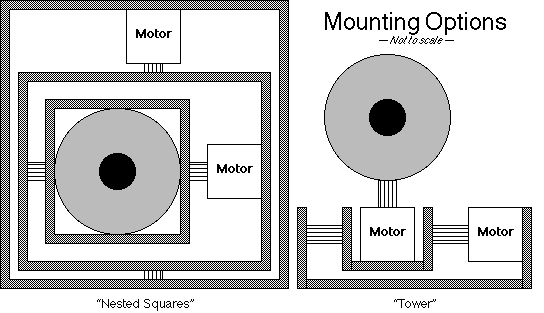
The mechanical aspects of mounting the camera were greatly simplified when it was discovered that the QuickCam is capable of being mounted to a standard tripod through a threaded screw harness. This makes fastening the camera to the rotating body easy and also allows simplification of the truss design. There are currently two options being considered. The first option has two nested squares where the inner square rotates along the horizontal axis and the outer square rotates along the vertical axis. The camera is placed inside the inner square and is also fixed to the inner square via a screw. The motor which rotates the inner square is attached to the outer square so that when the outer square rotates, it also rotates the inner (nested) square. The second option is even simpler in that one motor will be directly connected to the camera, via a screw and pin, and the second motor will rotate a simple platform which will be fixed to the first motor. The second motor, which will be used for rotation about the horizontal axis, may need to overcome some considerable torque since the camera will be mounted in a tower fashion. Even though the camera is extremely light, the nature of the tower creates a large moment arm which increases the torque needed.
The motors obtained are 12V, 3.6 degrees per step, four phase, unipolar stepping motors. Since a resolution of two degrees or less is desired, the motors will have to be half stepped. Each winding in the motor requires 150mA for proper stepping or half stepping. The manufacturer included a driver schematic with suggested component values which will be used in the final design. The output control signals from the microprocessor are sent through a resistor to the base of an NPN transistor. The transistor behaves like a switch which is open if there is no voltage to the base (control signal of logical zero) and is closed if there is a voltage to the base (control signal of one). When the switch is open there is no current in the winding and when the switch is closed, it drives a current through the winding causing the motor to step. The common center tap will be biased at 12V from the power supply as this ensures that the collector of each transistor will be approximately 12V. With the collector biased in this way, and the emitter connected to ground, it is easy to see that any small signal to the base will switch the transistor to drive current. The diodes are used for protecting the circuit from transient spikes, and the resistors are used for current limiting.
The assembly code used for the control of the motors is also appended to this report. Symbol names for the proper address values of the output ports were first assigned so that they could be easily recalled throughout the program. Then program then goes through some initializing procedures to ensure that the motors' starting point is known. Next, the angle of rotation necessary to center the user is read in (this was calculated by the tracking device and the tracking assembly program) and converted into the number of steps the motor must turn. Since the bulk of the motion done by the user will be lateral as opposed to vertical, horizontal sweeping will be implemented prior to vertical sweeping. Once the number of steps is determined, the program looks at another memory location which will have information about the direction of motion. With this information, it can jump to either the forward rotation loop or the reverse rotation loop. After rotation is complete, the program saves the status of the horizontal position by storing two pieces of information, the pointer of the step sequence and the number of the step sequence. The pointer is used to ensure proper sequencing and cycle count. The last step of the horizontal movement is to call the vertical movement. This follows the same principles as explained above. The next call of the motor control program will be initiated by the tracking program upon calculating a new position to move. One thing which will be added to the program is a delay time in the rotation loops. The amount of time of this delay will be determined by how fast, or slow, the motors should rotate in order to keep the video signal stationary and to ensure proper stepping of the motors.